
Auto-translated from Spanish
To change the meta tags on your website, the first step is to identify which CMS your site runs on. In my case, this site is built on WordPress, but for you it could be GoDaddy, Drupal, or any other popular CMS. Keep in mind that nowadays pretty much every CMS has an option for changing meta tags, so… let’s get into it!

Changing Metadata in WordPress

-
Install an SEO Plugin: The most popular ones are Yoast SEO, All in One SEO Pack, and Rank Math
-
Go to the Post/Page: Edit the specific post or page.
-
Scroll to the SEO Plugin Section: Usually found below the main content editor.
-
Edit the Meta Tags:
- Title: Enter the SEO title you want.
- Description: Enter the meta description.
-
Save/Update: Click “Update” to save the changes.
-
- Go to Your Online Store: Select “Themes” and then click “Customize.”
- Edit the Theme Code: Go to “Actions” and then “Edit code.”
- Find the Template: Locate the “theme.liquid” file or the specific page template.
- Add/Edit Meta Tags: Use Liquid to set meta tags dynamically.
- Example:
<meta name="description" content="{{ page.description }}">
- Example:
- Save Changes: Click “Save.”
Changing Metadata in Shopify

Changing Metadata in Wix

-
- Go to Your Wix Dashboard: Open the site you want to edit.
- Access the SEO Tools: Click “Marketing & SEO” and then “SEO Tools.”
- Edit Meta Tags:
- Site-Wide: Go to “SEO Settings.”
- Page-Specific: Edit a specific page and go to “SEO (Google).”
- Title: Enter the SEO title.
- Description: Enter the meta description.
- Publish: Click “Publish” so the changes go live on your site.
-
- Install an SEO Module: Such as Metatag or Yoast SEO for Drupal.
- Configure the Module: Go to the installed module’s settings.
- Edit Content: Navigate to the content you want to edit.
- Meta Tags Section: Find the Metatag section in the content editor.
- Title: Enter the meta title.
- Description: Enter the meta description.
- Save: Click “Save” to apply the changes.
Changing Metadata in Drupal

Editing Through HTML Code
No matter which CMS we’re talking about, every website has the option to modify this kind of value — the meta title and meta description — through the HTML code. Before I show you how to do it, I always recommend using the options described above first, since they follow much safer logic and won’t risk potentially blowing up your website 💥, which can happen if you edit the code directly. If you’re already aware of that, here’s how you can change it for a specific URL.
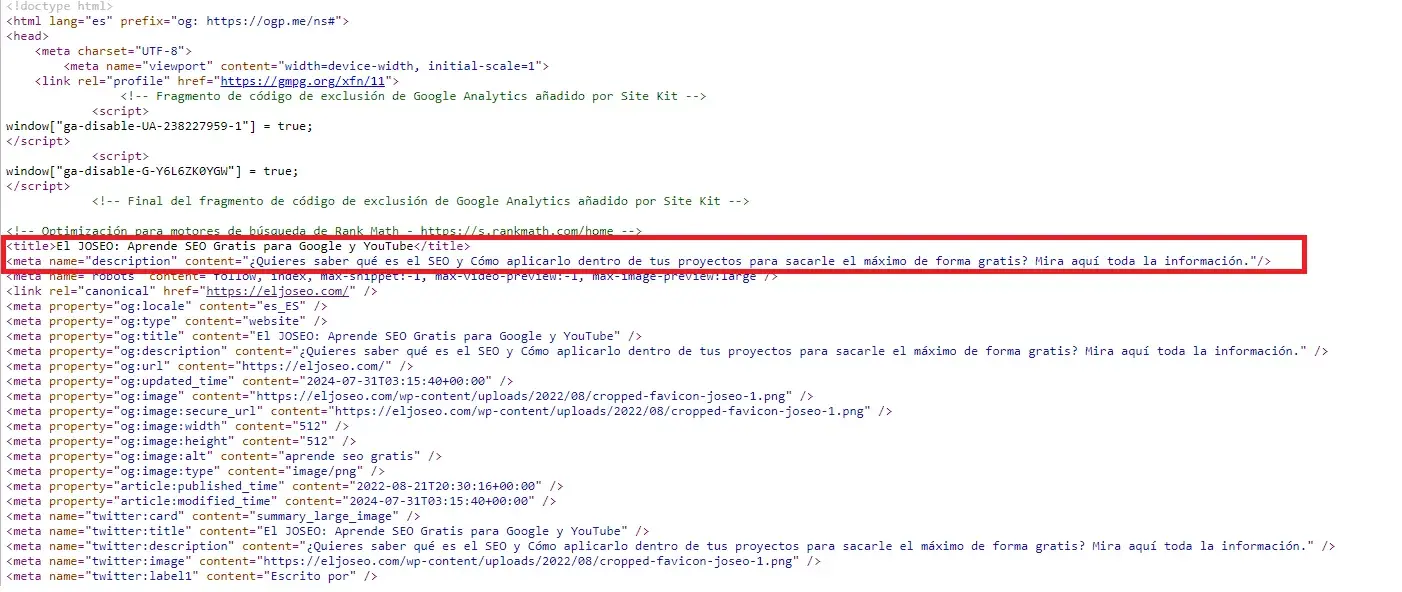
As you can see in the screenshot I took from my own website, there are specific tags with their own particular style and format, called title and meta name=“description”. By editing the content inside these, you’ll be able to change the meta tags through the HTML code. Here’s an example:
<title>Between these two title tags would go the title you want for that URL</title>
<meta name="description" content="between these quotation marks would go the meta description you want to use.">
Once you’ve changed these tags to your liking, save the code and that’s it!
P.S.: I didn’t show you how to view the HTML code of a specific page, but you can easily look that up on Google — just search “how to edit the HTML code in [X] CMS” and someone out there will have the answer!